
How to take photos of your teeth
at home for a pre-assessment
To help our clinical team understand your dental concern before your appointment, we kindly ask you to take and send us a few clear photos of your teeth. This allows us to assess your situation in advance and ensure you receive the most appropriate care when you visit the clinic. Please follow the steps below to capture the images clearly.
Use your phone’s camera in selfie mode or with the timer on.
Or ask a friend or family member to take the photo using the back camera for better quality.
Step 1: Prepare Your Camera
Step 2: Set Up
Place your phone on a stable surface (like a shelf or table) at face height.
Make sure you are in a well-lit area - natural light is best!
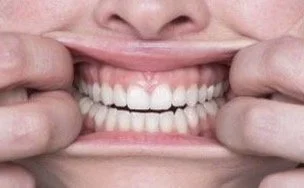
Use your index fingers to gently pull your upper lip up. (As shown in this image)
Use your middle fingers to pull your lower lip down.
This helps us clearly see your front teeth and gums.
Step 3: Position Your Hands
Take 2–3 photos from slightly different angles.
Make sure your teeth and gums are clearly visible (no blur or shadows).
Step 4: Take the Photos
That’s it!
We’ll review your photos and get back to you with advice or next steps as soon as possible. Thank you!